Speciality 590nm Post Processing to OVERCOME Difficult Images!
Oh my, where to start… Hmm well I think that there is no need to proceed in any order so I will tackle the most important images in order rather than by location!
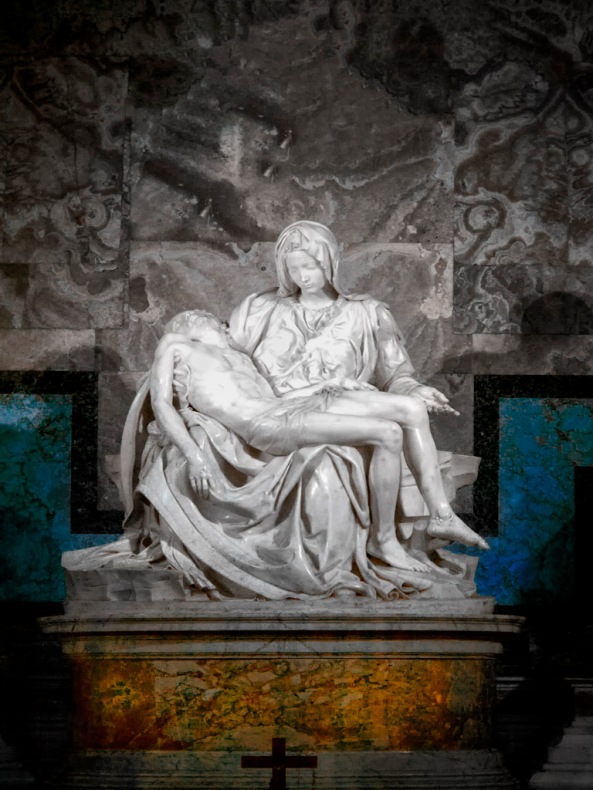
Looking at the image of the Pieta above the first thing that comes to mind is the full beautiful saturated colors. One would look at this and never realize that this is a Faux Color Infrared image! It is indeed a 590nm IR images taken on the Panasonic GH2 with the 14-140mm lens, INDOORS, THROUGH PROTECTIVE GLASS at a super high ISO of 1250, 1/60 s, f/5.6 HANDHELD. It is in fact not a scene that one would normally consider for Infrared. This is EXACTLY why I did choose it. Color was nice, but everyone shoots it in color. I desired something different and new. I cannot imagine that it has EVER been photographed in Infrared!
Post processing for this one took considerably longer than the standard 30 seconds with CS5 and the Nik filters. There were also several problems with the scene that I had to overcome! First and foremost was the Plexiglas shield between the public and the statue. It was not exactly clear and there were literally thousands of people standing there shooting wildly all of them using their flashes which were just bouncing off the plastic making it more difficult to see through. Also there was a large window just over the head of Mary which had the sun directly behind it. Ok how I did this image:
- I took my time moving up through the crowd until I got to the rope divider and placed myself directly in the center of the plastic so that I would not cause issues from photographing from an angle.
- I made sure to have the flash turned off (its normal condition).
- I set the ISO to 1250 so as to have a f/5.6 aperture at at least 1/60s shutter.
- I chose a zoom range of 24mm so as to overcome lens bending issues.
- I then choose the composition in the Portrait mode and set my exposure ON THE WHITE STATUE set to Zone 7 and 8.
- I took a LOT of pictures as I needed to overcome camera shake, other folks flash reflections bouncing back at me and reflections in the plastic. By a lot I mean 20 or so images…
Things to consider when shooting through plexiglass:
- Your overall contrast will be greatly reduced so PERFECT EXPOSURE is a must!
- Flash bounce back from others cameras will KILL your image.
- Low shutter speed will require a solid support.
Still, knowing all of the issues I knew that I could overcome them in Post Processing, so I simply set everything up and shot away with the thousand other tourists!
I trusted my ability to set the exposure perfectly on the white statue in the spot meter mode of the camera and then wisely selected ZONE 7 & 8 by dialing in the appropriate positive exposure compensation. I also knew that I could hold the camera quite still and trusted in its built in image stabilizer to help. I used the LENS HOOD to cut down on flash reflections striking my lens objective and causing further loss of contrast (you do this also… right?)
After getting back home I went through my 20 images and selected the absolute best version to move into the post processing phase.
My Post Processing Recipe:
- Using Capture One RAW converter I made sure that the image was straight. I adjusted the contrast up about 10% and adjusted the exposure so that the RED channel was from edge to edge in the histogram. I also insured that there were no hotspots on the statue.
- After converted to a 16 bit TIFF image I opened it up in CS5
- I cropped the image to my master image size of 8.5″ x 12.5″ at 300 dpi.
- I ran Nik Define 2.0 and manually chose measurement points on the statue and the marble wall behind it.
- I ran Nik Viveza and increased contrast up again by 10%, structure up 10% and brightened the overall image a few percent.
- I used the lasso selection tool and selected the window behind the statue and then via edit > fill with content aware allowed CS5 to remove the window and replace it with more marble from around it. I had to reselect the edges a few times and go through the process again to make sure that the marble blended perfectly!
- I now ran the Channel Swap Action that you can download from here. At the end of the action it pops up a window with the color channels. From that window I selected RED and made saturation and hue adjustments, Yellow with saturation and hue adjustments, Cyan for saturation and hue adjustments (cyan is the most important adjustment, this is where you overcome the blue/green sky during the channel swap by adjusting the hue control towards the blue end!) then selected OK to end the action.
- I ran Nik Define 2.0 again to clean up some noise generated by the channel swap action.
- I now ran Nik Viveza AGAIN and using selection points I started at the top of the image and worked my way down to the bottom adjusting BRIGHTNESS, CONTRAST, STRUCTURE, RED, GREEN & BLUE levels and finally SHADOW adjustments. All in all I placed about 100 selection points in the image to get it just right. As you can see, this recipe is much more detailed than that which I usually use for normal Infrared post processing!
- I ran Nik Viveza AGAIN and darkened the four corners to force the viewers eyes into the image center.
- I ran Nik Color EFX Pro and chose the Vignette: BLUR filter and adjusted the outside edges of the image to be slightly blurry.
- Flatten and save image as a PSD file with a name that is meaningful!
That is it. The entire process took about 20 min from start to end and I feel that the process was very much worth the time investment.
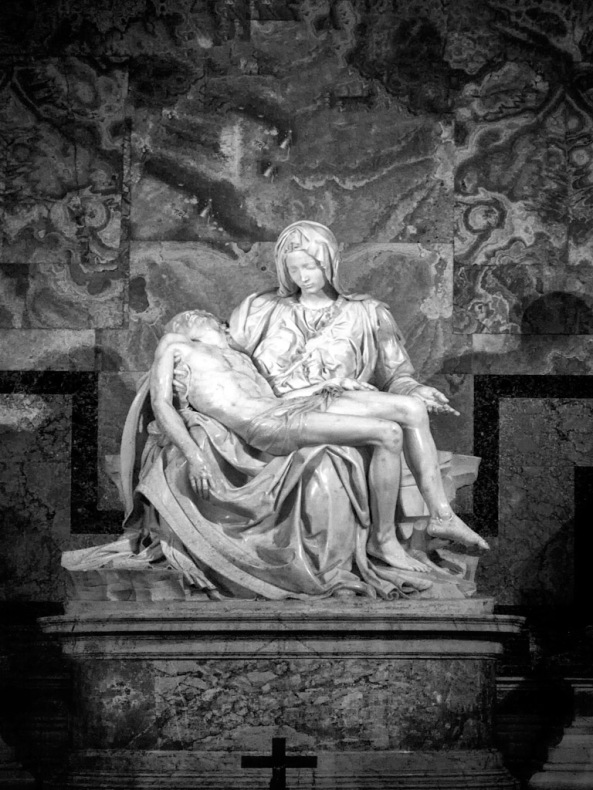
Here is a B&W version generated by Nik Silver EFX Pro 2 for you to compare. It looks good, but the color image just grabs me by the throat and screams, LOOK AT ME!


