OK, It Starts Again – IR Camera #14 (I think…)

Panasonic GH2
Well… I think this makes camera #14, but I have had so many that I am no longer sure! This is really a sad state of affairs. As you all know, I have touted the Olympus E-PL1 as the “King Of Infrared” for a year or so now. But sadly, the King has died, long live the King! I am not very sad over sending the color GH2 off to be twisted into 590nm, after all, I am addicted to IR. Rather I am sad over loosing such a fine COLOR system!
It is true though, that I have returned to my Canon systems for color work, and I am very happy with the results there. So on with the show!
The body functionality of the GH2 is simply amazing. It rivals that of the advanced Canon and Nikon bodies but in such a form factor that it makes using it a joy! I love the fact that it is such a small body. Add in the fact that it is a 16 megapixel system with both a built in electronic viewfinder and an articulating LCD panel guarantees a true winner.
I sent the camera off to Spencers Camera in Utah and had it back in 3 days! I decided upon 590nm for this camera rather than Full Spectrum because I find that 99% of the time I shoot in either 590nm or 630nm. I can change between the two with the addition of a B+W 091 630nm filter on the lens which costs about $25! This means less to carry when I travel which is very important to me.

The GOLDIE or SUPER COLOR IR Conversion, GH2 Camera
When the camera was returned from Spencers the first thing that I noticed was that I had NO idea how to set the custom white balance. Spencers had programmed this into the body but I needed to do it again as I am going to use the Panasonic 14-140mm lens on it. I did some research on the web and discovered how to do a proper WB and no matter how hard I tried I could not get my WB to match Spencers. So I called them and was informed that they only use a gray card in direct sunlight to WB with! OK, I will file this data away for later consideration! For now I have both Spencers WB and mine (green grass) programed into the camera (yes it can hold 4 custom WB settings).
Today I took the camera out and did some test shots using both WB values in a good location that gave the triangle of IR compositional elements:
- Sky with clouds…
- Reflective Water…
- Various types of Green Leaves…
One major difference that I discovered between the 590nm GH2 and the E-PL1 set at 590nm is that the GH2 did NOT over expose the red channel! The internal exposure metering system handled Infrared poisoned with Red Visible light perfectly! This really is a big step forward in that I can again trust the exposure meter and concentrate on the subject.
Refresher on 590nm Infrared:

Various IR Filter Curves, Look At the 090 For 590nm
There are some minor issues when using a 590nm filter that you must understand in order to overcome.
- 590nm is firmly in the realm of the visible spectrum creating visible overexposure from 590nm to 700mm.
- White Balance is ALL important to getting good color and proper exposure.
The first listed issue really is the most important one to understand. Our camera’s electronics and algorithms are designed with color images in mind. When we remove the hot mirror (UV/IR Cut Filter) and attach a dedicated 590nm or 665nm filter OR a clear glass filter (Full Spectrum) and use a 590nm external filter, we are allowing a small amount of visible light from 590nm to 700nm strike the sensor along with the infrared spectrum from 700nm to 1000nm. Since 590nm is in the deep red area of the visible spectrum the RED channel is overwhelmed with bright red light and the blue & green channels see more of the 700nm and up light. This tends to confuse the camera computer and while it will display a normal looking histogram (monochrome), if you look at the separate RGB histograms the red is off the edge and way overexposed! Usually you can overcome this during the RAW conversion process by changing the exposure down 1 or 2 stops in conversion. Sometimes the overexposure is so bad that you are out of the range of repair during the conversion process. So I following the following steps to overcome this in camera:
- Proper White Balance to equalize the color Channels
- Set the camera histogram to separate RGB channels so that I can directly monitor the RED channel
- Check the exposure on EVERY shot and dial in the appropriate exposure compensation. Normally this is around -1 or -2 but some subject matter like lots of leaves will require you to switch to manual exposure to go – 3 or more! A cloudy sky will actually force you to add + exposure compensation. Just take a test shot and check the red channel histogram then make the proper adjustment.
- ALWAYS use your lens hood to prevent lens flare as well as to keep contrast up by stopping light from hitting the objective lens at extreme angles.
590nm will generate very pleasing warm Faux Color images that dip in to Gold tones hence the name “Goldie Filter”! This can work for very pleasing images that will stun you with their emotional impact. Yet they will also generate VERY nice B&W images as well in Post Processing! If you find that you do not care for the Gold tones you can simply reprogram the camera with an external filter to get different results!
- B+W 091 630nm medium red filters will move you into the Pink/Red toned Faux Color Images and cost around $30.
- B+W 092 695nm dark red filters will move you into the Red/Copper toned Faux Color Images and cost around $100.
- Hoya R72 720nm deep red filters will put you into the Coppery toned Faux Color Images and cost around $120.
You can go even higher, 800, 850 ad 900nm but these will require the use of a tripod and they are VERY expensive filters! Not bad for a dedicated 590nm camera! You can still change the flavor of it with the addition of an external filter. The only rule is that you cannot go to an external filter lower than 590nm.

Gray Card Set for Setting Camera White Balance
OK, lets look at some sample images. I am going to show you 2 sets of 3 images. First set is with the camera WB set to green grass. Image 1 will be the RAW image straight out of the camera, Image 2 will be the Faux Color version and Image 3 will be the B&W. Set 2 will be the same 3 images but with the WB set to a Gray Card in bright sunlight. You will be AMAZED by the difference that WB can give in your photography after viewing them. The Gray card used is a simple plastic set that I purchased from Amazon for about $10.00.
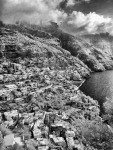
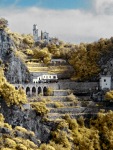
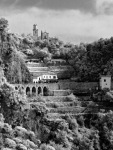
OK, here is set #1 with the WB set to the Green Grass:
RAW:

RAW image, WB to Green Grass

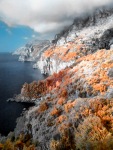
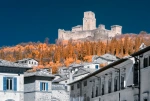
Faux Color Post Processed, WB to Green Grass
Notice the lack of gold tones and the shift to orange/red trees. There is a little yellow grass. To me this is still a very pleasing image overall!

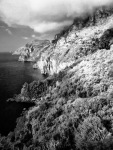
B&W Post Processing, WB to Green Grass
A very nice B&W image that can still have a lot of work done on it for improvements!
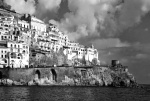
OK, now set 2, the same basic images but with the WB set to the 18% Gray Card!
RAW:

RAW Image with WB set to the Gray Card
Notice that the colors are WAY off from the image WB’ed to the Green grass! The sky has shifted towards a greenish/copper and the leaves have shifted towards Aqua while some of the green has taken on a Yellow glow.
Faux Color:

Faux Color image with WB set to the Gray Card
Here is where we really see a major difference! NOW the trees have the classic GOLD tone that one expects from the 590nm band! Some of the grasses are still pink but different plants look different in IR!
B&W:

B&W Post Processed with the WB set to the Gray Card
Even here we see differences between the two different WB’ed images. This is due to the fact that B&W Post Processing is determined by the range of COLORS of the image that we start with!
So, what I am seeing here with these two sets of images is that WP has a MAJOR effect upon the finished product! The first set of images actually look closer to what you would see with a B+W 091 690nm filter in place rather than a 590nm filter! We will discuss this in greater detail in the next post (Part 2) in the next few days. For now this should give you a lot to think about in relationship to White Balance!
On top of that you have to admit that the clarity and sharpness of this camera/conversion and lens is simply remarkable! I am very excited about the fact that the exposure is dead on so far. I will also experiment with the exposure and histogram in the coming days in varying sunlight and different subject to insure that indeed the Panasonic GH2 is the NEW KING OF INFRARED!
What do you think…?


 filter! This opens up an entire world for you to explore. The camera will see everything from UV to FULL COLOR to INFRARED! You simply tell it what you wish by your choice of external filter. If you only are interested in 590 nm, 620 nm and 665 nm then any digital camera will be fine for you. But if you wish to explore some of the alternatives, like the Super Blue (in camera Faux) or UV+IR (UG1) or the deep IR filters like 720nm (standard), 850nm (deep IR) and lower then you MUST have a camera with live view or full time LCD display! The reason for this is the fact that normal DSLR camera systems use an OPTICAL image path that goes from the viewfinder thru a prism, bounces off a mirror and out thru the lens and filter! If your filter is dark then you cannot see to compose although the camera will still focus! Live view will allow you to overcome this problem. There are some REALLY interesting filters out there like the UG1 (UV+IR) and the 047B (Super Blue in camera Faux) that will only work with an internal or Full Spectrum conversion but need a live view with the Full Spectrum Conversion! Now, the additional costs are the prices of the external filters to fit your lenses. The darker the filter the more they cost!


