New Fuji 55-200mm lens for IR!


Finally, a LONG X Lens for the Fuji Family!

Pawleys Marsh, Fuji X Pro 1 720nm IR conversion w/ the new 55-200mm lens.

Pawleys Marsh, Fuji X Pro 1 720nm IR conversion w/ the new 55-200mm lens.

Fuji X 55-200mm

Fuji X 55-200mm

Yes, the new Fuji 55-200mm lens arrived for my fuji camera systems!  I am currently shooting with a color X-E1, a color X Pro 1 and a IR converted (720nm) X Pro 1.   I know how well the 55-200 works on the color bodies but what I really needed to know how did it work with the IR system!  Would it give hot spots as so many of the Fuji lenses do?  This post is the report of my findings.  The final verdict is that it works very well and as long as you do not go higher than f/16 there are no hot spots to worry about at any zoom range! To me this is a really big deal.  

So far only the 14mm and 35mm Fuji lenses are usable in infrared. So the addition of another lens really helps.  

I am going to give you some examples of how this lens actually does at both the wide and long ends of the zoom range wide open and closed down so that you can get a feel of the usable Infrared range that you can use.  Next week I will do a posting using the lens for color work only.

Pawleys Marsh, Fuji X Pro 1 720nm IR conversion w/ the new 55-200mm lens.

Pawleys Marsh, Fuji X Pro 1 720nm IR conversion w/ the new 55-200mm lens.

OK, let’s take a look at the good and bad of the 55-200 in IR, the Wide end:

55-200mm @ 55mm, f/23.5 No hot spot

55-200mm @ 55mm, f/23.5 No hot spot

55-200mm @ 55mm, f/11  Small hot spot

55-200mm @ 55mm, f/11 Small hot spot

55-200mm @ 55mm, f/22 Bad hot spot

55-200mm @ 55mm, f/22 Bad hot spot

As you can see as you get to f/11 we start to develop a small hot spot, but nothing that cannot be fixed.  Above f/11 the lens becomes unusable at the wide end.

Now, let’s take a look at the long end of the zoom range:

55-200mm @ 200mm, f/11 Bad hot spot, NO HOT SPOT

55-200mm @ 200mm, f/11 Bad hot spot, NO HOT SPOT

55-200mm @ 200mm, f/4.8 Bad hot spot, NO HOT SPOT

55-200mm @ 200mm, f/4.8 Bad hot spot, NO HOT SPOT

55-200mm @ 200mm, f/22 Bad hot spot, SMALL HOT SPOT

55-200mm @ 200mm, f/22 Bad hot spot, SMALL HOT SPOT

The difference at the long end of the zoom is amazing and is usable over the entire range of the aperture!  This is great news for us IR shooters.

Pawleys Island Marsh, 200mm B&W Post Processing

Pawleys Island Marsh, 200mm B&W Post Processing

There is starting to be a large number of IR photographers out there who are using converted Fuji X Pro 1 camera systems.  There are currently 2 conversion companies out there who can do the conversion.  I HIGHLY recommend the X Pro 1 as an Infrared platform and with the addition of the 55-200mm lens to our shooting arsenal we are way ahead of the game!


A Simple Tutorial on Infrared Post Processing…

from my fine art photography blog

Murrells Inlet Marsh, X Pro 1 720nm IR Faux Color

Murrells Inlet Marsh, X Pro 1 720nm IR Faux Color

The Fuji X Pro 1 has turned out to be one of the best Infrared camera systems that I have ever used… period!  The only good Fuji lenses for Infrared have proved to be the 35mm f/1.4, the 18mm f/2 and the new 14mm.  The Viogtlander 75mm f/1.8 has also proved to be a STUNNING lens also!  So, the camera has proven its infrared capability, now it is time to discuss in detail the recipe for post processing!  It is all quite simple but there are a few requirements that you must understand in order to follow my workflow with understanding.

Needed:

  • Photoshop CS5 or CS6
  • Nik Filters, Viveza, Define Silver EFX Pro plugins for Photoshop, NOT LIGHTROOM.  (You can now purchase the entire library of Nik filters for $149)
  • Kromography False Color Action which can be downloaded here from the right menu bar under the box menu.  You can simply  click on it to download to your computer then drag it to photoshop to install.
  • A converted Infrared camera system capable of generating enough color data to make Faux Color images.  This means 720nm, 665nm, 630nm and 590nm conversions.
  • The ability and desire to experiment!

As you move your RAW (shoot only RAW for IR because of the ability to shift the white balance easily) onto your computer you should automatically tell yourself that you are going to process each selected image in Faux color and B&W.  Sometimes you will notice that the un processed image looks great also (wonderful bronze tones) and decide to do a version like this as well!

Lets talk about the RAW conversion process a little bit.  Photoshops ACR built in RAW converter will NOT apply the white balance correctly and your images will appear deep red.  For this reason I use Capture One version 7 from Phase One.  It is simply the BEST RAW converter that I have ever used.  You can download a trial version and decide for yourself if what I am telling you is true!

My Initial Editing Steps:

  1. Move images from my camera to my computer with an intelligent download tool that renames them with a meaningful name and create an intelligent directory tree for my RAW Library.  For this I have tested dozens of tools and found that Ingestimatic is the best and lowest cost one out there! You can find them here.
  2. Visually edit the RAW files by deleting the images that are simply no good.  Do not clutter up your computer with these useless files.
  3. Batch process my RAW conversion choices and adjust the exposure, contrast and angles.  Capture One will allow this and place the converted image files into a storage directory for later editing.
  4. Within Photoshop, open  each converted image one at a time for post processing
  5. Run Nik Define 2.0 in its default mode on the image for noise reduction, Save.
  6. Run Nik Viveza and without using any selection points increase the structure around 10% and the contrast about 5%, Save.
  7. Having installed the channel swap action that you downloaded here, run it on your image.  The last thing it will do is to open a Hue/Saturation window with the Master channel selected.  Simply select the CYAN channel  and vary the HUE a little bit to bring the sky to a normal blue rather than a blue/green.  Then select the RED channel and adjust the saturation up to a value you like, and repeat with the YELLOW and MAGENTA channels.  When you are happy with the results click on DONE to move on.  REMEMBER:  This is to only get the colors of the FAUX COLOR IR image into the ball park!  The real adjustment will happen next.
  8. Run Nik Viveza again.  Here is where you will use your control points to slightly adjust the colors and contrasts of various image elements to bring out a stunning, etherial work of art!  LOOK closely at your image, decide what you wish to adjust (Hue, saturation, contrasts and de-saturation). MORE ON THIS LATER!
  9. Run Nik Define one more time.
  10. Flatten the image, crop to taste, correct any imperfections (healing tool and content aware fill).
  11. Save the image with a meaningful name in a planned and thought out master image library.
  12. With the finished Faux Color image still open in Photoshop, now run Nik Silver EFX Pro to do your B&W conversion.  There are several built in recipes in this filter that can be used as a starting point.  My favorites are:
  • High Structure Harsh
  • High Structure Smooth
  • Full Dynamic Range Harsh
  • Full Dynamic Range Smooth
  • Fine Art Process
  • Wet Rocks (once in a while)

Save your image again with a NEW file name that reflects the difference in your master image library tree!

Murrells Inlet Salt Marsh, X Pro 1 720nm IR

Murrells Inlet Salt Marsh, X Pro 1 720nm IR

Remember:  Process ALL IMAGES as both Faux Color and B&W.  You really do not know what you are going to get till you do so.

All of this really is VERY SIMPLE and once you have done it a few times it will become second nature to you.  Soon you will be a post processing Infrared God or Goddess!  Congratulations

No, let’s take a look at the image below.  Notice the areas that I have circled as places where I desire to change the colors, contrasts and saturations (both plus and minus). Also consider that this is a 720nm converted camera and as such has a very limited color range (light pinks and warm tones and blues).

Annotated Faux Color, X Pro 1 720nm IR

Annotated Faux Color, X Pro 1 720nm IR

It is in this area and others like them (similar color values that are the same) that we are going to place control points on and change these values!  If you notice that the areas around them also change a little you can place what we call anchor points which are simply control points with no adjustments to bring those areas back to where you wanted them!

You will find this ENTIRE process from the initial loading into photoshop to finish will just take 4 or 5 minutes or less as you become more practiced!

Here are a few more images for you to consider that were taken on the 720nm Fuji X Pro 1 camera system:

Stormy Seas Faux Color, X Pro 1 720nm IR

Stormy Seas Faux Color, X Pro 1 720nm IR

Stormy Seas B&W, X Pro 1 720nm IR

Stormy Seas B&W, X Pro 1 720nm IR

Sometimes Faux Color images simply do not work, then you still have the great B&W ones to work with!

SC School Bus Boat, X Pro 1 720nm IR

SC School Bus Boat, X Pro 1 720nm IR

SC School Bus Boat, X Pro 1 720nm IR

SC School Bus Boat, X Pro 1 720nm IR

Was this information helpful?  Please let me know one way or the other!

Repost: Fuji X Pro 1 For Infrared, Part 1, Technical Details


Creating Emotional IR Images From Your Heart

This post was originally posted in my Fine Art Gallery BLOG at: http://markhilliardatelier.wordpress.com/

Using the Fuji X Pro 1 for Infrared

Infrared photography means so many things to me… It is more than a type of photography, rather a passion or better yet an addiction! I have a LOT of experience in Infrared, I have a book in work on it, but MOST IMPORTANTLY, I have practiced the art of creating emotionally charged Infrared images for longer than I can remember, even as long as 45 years ago with film.  Here, today, I will disscuss with you the technical details of using your Fuji X Pro 1 camera system to create these emotionally powerful images as well.

X Pro 1 Faux Color IR Image with only the channel swap

Understand this, you can create Infrared images several different ways:

  1. Film:  Rolli makes a great 720nm IR film in many different formats that with the addition of a 720nm filter on your lens will create great IR images at 100 ISO, and with no filter great B&W images at 400 ISO!
  2. Hoya R72

    Standard Digital COLOR Camera:  With the addition of a 720nm or 850nm IR filter on your camera lens your camera can capture Infrared images.  There is a tradeoff to this way though because each camera manufacturer places some sort of UV/IR blocking filter over the image sensor that allows only visible light to pass through.  Some of these filters are weaker than others and these cameras make for a system that will do well in Color and OK in Infrared with reasonable IR exposure times around a second or two.  Others have a strong filter allowing only a small amount of IR energy to pass.  These require VERY LONG exposure time in order to overcome this filter.  The Fuji X Pro 1 is one of the cameras with a weaker filter! This is exciting because it enables you to easily create IR images with an unmodified camera system!

  3. Converted Infrared Camera:  This type of system is the most popular by far.  There are 2 types:
    • Full Spectrum conversion: The internal UV/IR blocking filter is removed and replaced with a clear glass filter. You can then program the camera with an external IR filter in any range from UV to Color to Infrared!  This is the most adaptable IR system but costly because IR filters for your different lens sizes are expensive!
    • Dedicated Infrared Conversion:  This type has the internal UV/IR blocking filter removed and replaced with a specific IR pass filter and will create IR images in that band only.

What your camera sees!

So with regard for the Fuji X Pro 1 system we are going to discuss option #2, the standard color camera with an external IR filter attached to its lens.  But you ask: “What filter can I use?”. Well since we are not modifying the internal UV/IR blocking filter you must understand that the camera will pass normal visible colors as well as IR if the external filter allows it.  This is both good and bad!  If you were to install a 590nm IR filter on your lens the camera, it would see everything from 590nm up to 1000nm.  But because the internal UV/IR blocking filter allows much more visible light than IR through, it will poison the exposure metering system.  It is going to see the vast majority of the light as color (red) and expose for that rather than the IR portion.  So attempting to do this will cause very unreliable exposure and great frustration on the part of the photographer.

What we need is to attach an IR filter that blocks ALL of the visible light and only passes IR to the sensor!  So it is best to choose a 720nm IR pass filter to your lens like the Hoya R72 or a 800nm B&W IR only filter like the B+W 093.  The higher you go in nm the longer the exposure time will be…

Now, knowing that we are going to use the 720nm filter which will only pass IR energy from 720nm and up while blocking ALL of the visible light our metering system will now function as it should!

Considerations of problems that must be overcome within the X Pro 1 to get good IR images

  • Even though the Fuji X Pro 1 has a weak UV/IR blocking filter there is still one there.  Exposure time at a normal low noise ISO of 800 and below will still require an exposure time too long to hand hold and still get sharp images.  Most of mine were at 1/30s and longer.
  • Yes, the X Pro 1 works well at high ISO settings, but in IR the camera will still create noise in the dark areas of the image.
  • Fuji X Pro 1 with a custom WB right out of the camera. This is as close as you can get but will still generate a great image.

    White Balance is IMPORTANT when shooting in IR!  The X Pro 1 will NOT reliably do a custom white balance with the 720nm IR filter installed.  But it does have a manual Kelvin White Balance option, so when shooting IR you need to go to this sub menu in the WB settings and set it to 2500K.  I have talked to others doing this and have heard that they also take away green as well in the menu.  I personally think that this is unnecessary and by leaving the green neutral you will get more pleasing Faux Color images.  A properly white balanced image taken on your camera has s slight reddish cast, the sky should be bronze and the green leaves should have a monochromatic feel with a bluish cast. (more on this later) An improperly white balanced camera image will be pure dark red.  While you can still use this image in post processing the lack of a good white balance will throw off your exposure system. Read your camera manual on white balance and understand it!

  • Longer shutter speeds need a tripod to get sharp images!
  • Remote shutter cable to cut down on camera shake!
  • The Hoya R72 720nm IR filter will generate good Faux Color infrared images some of the time, but good B&W images all of the time.  Keep this in mind while shooting and plan to always explore both options in post processing!
  • Faux Color IR images require a channel swap in post processing.  ONLY the Photoshop family (CS through CS6) has this function built in!  Photoshop Elements has an optional plugin called Elements Plus that you can purchase to do this.  Lightroom and Aperture DO NOT have this function!

Ok, enough of this for now. Lets talk images…

 The Hoya R72 IR filter is almost black.  You can see very little through it but don’t worry, the camera can see through it just fine!  You can find these filters on Amazon for about $58.00 in 52mm.  There are a lot of other filter companies out there that make these, some good some not so good… I trust the Hoya!

Mount the filter on your lens, set the ISO to around 1000 and put the camera on a tripod.  Make sure that you have properly set the WB either as a custom on or as a Kelvin entry.  If you choose custom, the camera will require a lot of light to due this properly.  Use green grass to generate the custom white balance.

I like to use the optical viewfinder rather then the LCD or EVF for shooting in IR.  Choose and frame your subject carefully.  Hmm, a word about composition…

There are three items that can make IR images really powerful and full of emotional impact:

  • Sky with clouds!
  • Water reflections!
  • Green Leaves!

The more of these items you can get in your images the better they will be!  Here is an example…

Clouds, Water and Leaves! What more could you ask for? While not done on a X Pro 1, this image could just have well been so!

 As you can see, the sky, reflections and leaves create an emotionally packed, etherial image that draws your viewer into it!  Keep these three compositional elements in mind as you go forth and create your images!

Exposure Issues…

OK, last part of this post!  There are a few small exposure issues that you need to be aware of while doing IR work.  They are:

  • Red Channel over exposure: The RED channel will aways expose a stop or more higher than the blue and green.  After you have taken the image and see the preview on the LCD panel look at the histogram.  It only displays the combination monochrome histogram and if it is close to being overexposed you will get better results by dialing in -1ev exposure compensation and re-take the image.  This is due to the red channel being more sensitive to infrared and causing the overexposure.  You can really see this during the RAW conversion or in photoshop during post processing by looking at the RGB histogram there.
  • Hot Spots:  Some people have reported hot spots in the center of their images when using the 18mm lens.  I have NOT personally  seen any evidence of this with my system as of yet.  Hot spots are areas in the center of each picture that is usually a stop brighter.  They are caused by light bouncing back and forth between the sensor and the lens elements.  These are lens specific and very little can be done while taking the picture to stop or reduce them.  BUT, the aperture can have a drastic effect on them!  If you see these then try adjusting the aperture and review the results, you just might be surprised!  You MUST ALWAYS use a lens hood when shooting in IR.  This will also help stop hot spots by stopping light from striking the objective lens at extreme angles then bouncing around inside the lens between elements.  If you do notice the hot spot you can remove it in post processing very easily by using Nik Filters Viveza.  You use the selection point by placing it in the center of the spot and then reduce the brightness!

OK, this is enough for today.  The next post will be a detailed Post Processing tutorial that will take you through both Faux Color and B&W processing.  I even have a photoshop action that you can download to semi automate the channel swap and cut down your post processing time!

Panasonic GH2 590nm Review Part 2, White Balance Revisited


Proper White Balance Makes Such A Difference!

The Gray WB Card

OK, I realize that in terms of actual helpful posts that it has been a long time.  With advertising for workshops and camera sales, things have been a little stale around here.  But all is not lost!  I have been out and about for 2 days shooting the GH2 (590nm) and playing with different white balances.  Todays post is about setting your WB on the GREEN grass and how it affects the image.  In the first review, I detailed the differences in setting WB on the grass vs. a Gray card, so I will not repeat that prices here.  With this camera (GH2) the choice of how you WB makes a MAJOR difference.  This weekend i simply forgot to bring along the Gray card so all of the work was done on the grass!  In my defense, it just seems to go against all of my advice on WB that I have given you in the past.  Green grass has always been the main source of WB and generally would produce really nice monochromatic tones in the LCD of your camera when properly done in the leaves and a nice bronze in the blue areas of the sky.  I would even Post Proces RAW files to take advantage of this from time to time.  But with a Gray card, the sky takes on a sickly greenish cast that just looks terrible on the LCD, but when you get the RAW file on the computer you get such vibrent gold tones!  What a difference it made…

The image below is an example of forced processing in Viveza caused by a Green grass WB.  It still looks good but it had to be forced in Post Processing….

I simply must remember to bring along the Gray card in the future!

Bellimatrix, 590nm, WB on Green Grass

I have to honestly admit that the Gray card works much better with the GOLDIE (590nm) conversion on the GH2 that it has any right to!  NONE of my other IR camera systems seems to be affected like the GH2 in this regard! I just HATE the way the RAW images look straight out of the camera with the Gray card, but in terms of Faux Color IR the difference is stunning!  The RAW images take on a greenish cast when done on the Gray card vs. the nice bronze & monochrome elements when balanced on the grass.  If you are looking for some interesting bronze tones straight out of the camera then you need to WB on the grass, but if you are shooting primarily for Faux Color then choose the Gray card. By doing so the yellows and golds seem to come naturally during the channel swap rather than being forced in Nik’s Viveza.

For B&W Post Processing, WB had an effect on the overall output, but much less so than when working in Faux Color.  You will notice tonality changes between the WB versions in the mid tones!

Bellimatrix, 590nm, B&W Processing

Still, you can achieve both if you desire in photoshop.  The choice is yours but to me it just makes sense to get the best results straight out of the camera!

The Hammond & Gilbert Mills In Rhode Island


The Gilbert Stuart Museum & Mills

In Color, Infrared and B&W

The Hammond & Gilbert Mills

The Hammond & Gilbert Mills

The Hammond Mill, Selective Focus

I would like to draw your attention to a specific Grist Mill in Rhode Island!  This is the Hammond and Gilbert Mills at the Gilbert Stuart Museum.  What is so unusual about them is the fact that they are 50 feet apart on the same creek feed!  The Gilbert Mill was a Snuff Mill with living quarters for the family above the mill.  The Hammond Mill is and was a standard Grist Mill.  Both Mills are in AMAZING condition and the location just screams “Photograph Me“!    Location is a little in the back country but well worth the drive.  If you would like directions then download the Mills GPX file in the download window to the right!

The Gilbert Mill

The Mills are full of promise!  Look for detail shots as well as wide angle shots.  If you arrive mid day then you will likely be only able to shoot in Infrared (hey, not exactly a bad thing, you think?)  I think that early morning would be the best.  There is a nice standing pond behind the mills for reflection shots and the water path below the mills is actually a fish ladder to aid in migration! As I said, VERY PRETTY!

I shot these images using a Panasonic GH2 Micro 4/3 camera body (Color) and the Pansaonic 14-140mm lens.  For the Infrared shots I used my Olympus E-PL1 Full Spectrum Infrared camera body with the Olympus 14-150mm lens and an external (on the lens) B+W 091 630nm IR filter.  Since the previous post has a lengthy description and recipe for post processing these IR images I am going to leave the same out of this post!

Again, I am going to place all of the images of these amazing mills in a photo album below and all you have to do is to click on any image to bring up the slide show!

_____________________

_____________________

I hope that you enjoy this collection of a VERY unusual Mill!  

Please let me know what you think!

Grist Mills Of Rhode Island


Post Processing the Infrared Grist Mills of Rhode Island

Hammond Mill, Selective Focus

I have just now getting around to post processing the Rhode Island section of The Great 2 Week Grist Mill Trip!  I cannot believe that I am so behind… Oh well, better late than never!  Since completion of the trip I have had 2 other Grist Mill Trips with a ton of photos in the que! All of these images were taken on my Olympus E-PL1 Full Spectrum converted IR system using the Oly 14-150mm lens with a B+W 091 630nm filter.

As you can see I processed for both Faux Color and B&W IR images because you just never know how they will look unless you try!

Does everyone understand exactly what a Faux Color Infrared image is?  It is likened to the old Kodak HIE IR films of the 80’s (I actually designed the silver salt growing system for that film while I worked at Kodak!).  In modern converted IR digital camera systems the images are true IR images, but since the sensor is RGB we have a lot of color data there!  To get to what the film was capable of producing we simply swap the data on the Red and Blue channel of the image in Photoshop, fine tune the colors in NIK Viveza and work from there!  Just because it is described as a Faux or False Color IR image doesn’t mean that it is so!

The B+W 091 is a little more on the red  end of the spectrum so the images tend to (when Faux Color…) lean more towards the pinks and reds.

Basic Post processing is as follows:

  1. After conversion of my RAW files in Capture One Pro v6 I then do my critical deletion edit using Bridge.  This is perhaps the most difficult step. You have to look beyond low contrast off color images and see what they can be. Look for coloration (this will get better with time), emotional impact (yes you CAN do this! I have several BLOG postings here that talk specifically about this one…) and sharpness and exposure.  Think about each and every image in terms of Faux Color and B&W! When finished, I then open the images one at a time in Adobe Photoshop CS5 with ALL of the NIK filters installed.
  2. I did my normal cropping to my master storage size of 12.5×8.5 making sure that the image was at 300dpi and in the Adobe RGB 1998 color space
  3. I ran NIK Software’s Define 2.0 for noise reduction. For this I simply accept the default settings!
  4. I then ran NIK Viveza 2.0 and specifically added 20% structure and 10% extra contrast without any control points so that the changes affected the entire image!  This was to create a brighter deeper image before I ran the channel swap Photoshop Action!  WOW!  WHAT A DIFFERENCE THIS MADE!
  5. I then ran the channel swap action and proceeded as normal with the rest of my Post Processing Recipe! This is the Khomography Photoshop Action that you can download here towards the bottom of the right hand menu! The action swaps data between the Red and Blue image channel and allows you to adjust the Hue/Saturation in the Red, Yellow, Green, Cyan, Blue & Magenta color channels separately!
  6. In the action select the Red, Yellow, Cyan and Blue channels and adjust each of them using saturation and hue to get the image elements to start to fall into place. Pay careful attention to the Cyan channel adjustment as most of the time the sky takes on a green/aqua tint which looks terrible!  Simply adjust the Hue of the Cyan channel to fix this!
  7. Now, Calling up Nik’s Viveza again I will select specific elements of the image with control points.  I will add contrast and structure then adjust the primary colors R,G and B to adjust the specific color of the compositional element to achieve the overall color I want for it.  You can also use the Warmth Slider to add or remove warmth.  This entire process takes only a few moments to do if you understand your basic color wheel and how to mix to change!  This process will give you your final ball park image!
  8. THEN I called up another of NIK Software’s world class filters and ran the TONAL CONTRAST filter in the COLOR EFX PRO plugin.  The result was this incredible image full of contrasts tonalities as well as contrasting colors!

Rather than simply place the images here in the post separately I am going to try Word Press’s new Photo Gallery.  Simply click on any of the images that you see to bring up a nice slide show!

Fine Art B&W IR Post Processing


A Well Done B&W Conversion Is Something Truly Wonderful To Behold!

630nm B&W IR, Rock Run Mill

I LOVE B&W photography!  Add Infrared into the equation and you have a winning combination what will draw your viewer in while holding them captive…. As long as you get the right combination in your B&W conversions!  Seriously, this is not all that hard but you would be surprised how often it is done badly!  A well done B&W conversion is something truly wonderful to behold!  But… There are several steps in the process that one should follow in order to create art on this level.

They Are:

  • A worthy subject!
  • Good cross image contrasts.
  • Good Exposure
  • Photoshop CS5
  • Nik Software’s Define 2.0, Viveza 2.0 & Silver EFX Pro 2
  • Good Faux Color Post Processing
  • Separate adjustment of image contrasts in the fore, mid and background
  • Choosing the right Silver EFX model or creating one of your own.

The purpose of this post is to take you through the process to create these types of B&W Infrared images as I do it.  I am not saying that my way is the best, only that it is the best that I have come up with that works for me!  There are dozens of B&W converters out there and hundreds of ways to accomplish the same within photoshop.

Let us take the top image as a case in point.  This is the Rock Run Mill in the Cumberland/Maryland Gap that I took on my recent “Great Grist Mill Trip” a couple of months ago.  I came back with hundreds of grist mill images that grab me by the throat and smack me around with their emotional impact (what more can you ask of an image?) , but this is one of my favorites!

I stood there in front of the mill for several moments just taking it in. I really looked closely at it all of the while deciding how I wanted to capture it.  Yes I photographed it in color, but my main intent was to focus on Infrared.  I examined it from all angles, looking at the fore, mid and backgrounds, the sky and trees.  I wanted, no desired to create an emotionally charged image that would grab my viewers and hold onto them.  I wanted them to feel what I did standing in front of it!

So, I settled on this view and angle.  The sky was moody, the mill with the brickwork  and large water wheel in front the the tree line made for an amazing composition.  I even used a tripod for this image wanting the best capture possible.  I decided upon the B+W 091 630nm filter (no surprises there) because of the combination of stunning Faux Color and B&W it would provide.  I set my exposure with a spot meter on the top quadrant of the black water wheel and set that at Zone 3 in order to establish detail in the holding buckets.  What!?!  You don’t know what Zone 3 is?  OK, I will cover that in a future post but for now, know that it is a term in controlling perfect exposure.  Everything else fell into place once I decided upon the exposure.

This is the image that I captured in Faux Color after post processing (see post on 590nm for detailed instructions on how I do this):

630nm Faux Color IR, Rock Run Mill

As you can see, the Faux Color image in itself is a stunning emotionally charged capture.  The post processing was a little more complicated due to the driveway and parking lot which was made up of tar and patches of stone.  This caused about 30 more seconds of processing with Nik’s Viveza… Oh well!  I really do like this image all by itself but I KNEW that I could do so much more with it in B&W!  So after saving this image as you see it, I continued on with my B&W post processing.

The order to things in the overall process is:

  1. Raw conversion into a 16 bit Tiff image.
  2. Crop to master image library size in Photoshop.
  3. Run Nik Define to control noise in the sky
  4. Run Nik Viveza to increase saturation, contrast & structure over the ENTIRE image.
  5. Run the Komography Faux Color Photoshop action (you can download it here on the right menu).  Within the Hue and Saturation window at the end of the action select the RED channel and bring up the saturation to start the color adjustment of the trees.  Select the Yellow and do the same.  Select the Cyan and adjust the HUE to bring the sky back to a normal blue!
  6. Run Nik Viveeza again to adjust fore, mid & background contrast.  Adjust individual element colors and structure.  Remove all saturation in the foreground parking lot and selected mill items.  Remove all saturation in the clouds.  Adjust the blue sky hue.  Adjust the color and structure of the building and wheel.
  7. Flatten and save.
  8. Run Nik Silver EFX Pro 2.0.  Adjust the individual elements after you select the B&W model.  For this image I chose the Wet Rocks option then using control points adjusted various image elements within the filter to get the overall look and feel to the image.  I spent about 5 min within this filter. I decided upon the Wet Rocks model because for this image I wanted a crisp or almost HDR effects!  Plus the model also gives rich blacks and highlights.  I could have simply adjusted the image the same way by taking control of the sliders within Silver EFX but have learned that several of the models give the results I like very quickly and easily!
  9. Flatten and save.

Here is the Nik Silver EFX Pro 2 window to show you some of the options that are at your control.  If you want to seriously create stunning B&W work then this is the way to go!

Nik Software's Silver EFX Pro 2.0

All done.  The overall time that I spent on this image was about 7 min!  I could have spent a little more to do little things like cloning out the cars to the right but I decided to leave them there as a subtle contrast of old and new!

What do you think?  Please let me know!

Images from the Low Country Infrared Adventure!


Seven Gifted Attending Photographers Share Their Work!

WOW!  How else to describe the 3 day Low Country Infrared Adventure!  It was an amazing time both in the workshop and out in the field shooting. Both Jamie and I were very impressed with everyone there.  We had seven gifted photographers in attendance, 8 hours in the classroom split between 2 days and 17 hours out shooting in all of the BEST Infrared locations in the Low Country.  Talk about tired, I am still dragging around.

We had a total of 7 photographers in attendance.  There were several Nikon IR conversions, Canon, Panasonic and Olympus systems. Every spectrum was covered from UV to Deep IR.  I am going to show case images from each of the attendees here in the days to come as they send their images to me so stay tuned and re-visit to see the new additions!

______________________________________

Donald E Brown

Mark,
Been at it all morning processing images from this last weekend.  I am hungry and my eyes are hurting and it is all your fault!!!  I have tried many variations of this shot  from “Roadside View”  and it and some other variations are fast becoming my favorites. 

Anyway, enjoy the scenery from my roadtrip home.

Old Barn Version 1

Old Barn Version 2

Old Barn Version 3

Old Barn Version 4

Donald was shooting a 665nm converted Nikon DX2 and was an established Infrared photographer.  He added a lot to the workshop/excursion and was a lot of fun to shoot with!  Donald, these images are just breathtaking!

More please….

______________________________________

Vicki Wilson

Hi Mark and Jamie,

I had a great time in the workshop! Thanks for sharing the IR cameras and letting me try out different filter types.  This has opened up a whole new fun area of photography, I love it! Here are a couple of my photos from the workshop.  Thanks again!

The Path...

Of Boats Long Gone....

Capt Andrew

Vicki was shooting with a loaner IR camera!  My Olympus E-PL1 Full Spectrum mainly with the 630nm filter and the UG1 UV/IR filter!  Her excitement was infectious and she is going to convert a Nikon D90 to the same!  I expect to see a lot of fabulous IR work from her!

______________________________________

Dave Lindey

Jamie/Mark

I processed each in FAUX color and Monochrome. Couldn’t decide which to send. I processed a total of 120 images from the weekend. The attached represents a variety of what I shot over the weekend. I spent the past week experimenting with the post processing and will likely go bacl over a few because I learned a few things along the way. All images were shot with a Nikon D200 665nm conversion processed with Capture One, Adobe Photoshop CS5 and Nik Dfine 2.0, Viveza 2.0 and Silver Efex Pro 2. Select what you like to post. I did not sharpen the images at all.

It was a great weekend.

Walkway, Georgetown, SC

The Path Less Taken....

The Tug Susan RIchards

Brookgreen Gardens Pond

Dave, I am stunned by these images!  To say that they take my breath away is simply an understatement!  For you to be creating this caliber of ART after only shooting Infrared for a year is amazing. Please continue to share your work with us!  I can see now that I am going to have to create a guest gallery now……..

OK, as I said earlier, stay tuned for more images from the workshop!


You are invited to the Low Country Infrared Adventure!


Jamie Konarski Davidson & Mark Hilliard
present an exciting, new Photographic Workshop &
Excursion Series on Fine Art Infrared Nature & Landscape Photography!

By Jamie Konarski Davidson

Come along with two of the most accomplished Infrared photographers on the Southeast coast for this energizing study of Fine Art Infrared (IR) photography! Learn about equipment needed for Infrared photography, what subjects  generate stunning IR images, and how to capture & process breathtaking IR images using this new digital technology.

By J.M. Hilliard

We will teach both Faux Color & traditional B&W post-processing techniques using Photoshop CS5, Elements 9 and Nik software. We will have several loaner IR camera systems for you to share if you do not yet own one!

Explore with us the rustic southern beauty of the Low Country. Along with two intense classroom sessions on Infrared Photography and post-processing, we will be shooting breathtaking land and seascapes in Pawleys Island and Brookgreen Gardens. In historic Georgtown we will capture local nautical themes, including the shrimp boat fleet and an ancient working boat yard where you will never know what you will find!

Infrared photography has become wildly popular in the past two years. It allows us to create new, different and emotionally intense images of things we see every day. Combine this capability with the stunning locations that we will be visiting, and you will understand why we are so excited to share this adventure with you.

Even if you do not currently have a Infrared camera  plan on attending! We will have loaner cameras for you to use as well as Infrared Filters to convert your current camera to Infrared!  This promises to be a great photographic experience for all!

By J.M. Hilliard

Tipster #3: Faux Color IR Post Processing In Adobe Elements 9


How To IR Edit On The Cheap…

It does not really matter what IR spectrum you are shooting in under 720nm.  Everything from 720 down to 590 can be processed within Photoshop as a Faux Color image.  You have seen hundreds of example images of this here on the BLOG as well as several recipe posts on how to do it within Photoshop CS5 using the NIK filter set.

This post then is to put forward a simple recipe on how to do this within Photoshop Elements V9 and lower.  The main issues being the following:

  • 8 bit files
  • Lack of automated Actions or scripts
  • Lack of any REAL ICC Color support
  • Lack of a Channel Mixer

The real deal killer is the lack of a Channel Mixer within Photoshop Elements. Without this one simple tool there is no way to exchange the Blue and Red channel information and emulate Kodak’s HIE films.

But what if we found a way around the lack of a Channel Mixer within Elements?  Wouldn’t this then open up the opportunity to use a very low cost photo editing tool to generate our stunning Faux Color Infrared images?

One of my readers made a recent comment on a plugin from a company called SimplePhotoshop.com that will give you several interesting plugins for Elements but also provide a Channel Mixer!  This is a great step forward.  After reading Martan’s comments I downloaded the plugin and tested it.  This post is about my results!

Before we actually get to the meat of the process let me start by telling you that I DO NOT LIKE ELEMENTS!  The interface is bad, the startup and libraian is terrible and the other issues listed above just turn me against it!  That being said, it is hard to turn up your nose to a product that only costs $70.00!

One other thing for you to consider… You really should be shooting in the RAW format!  Having 4.3 billion colors rather than 16 million is just not to be scoffed at!  Plus having 3 stops of exposure latitude prior to editing gives you great control on what is a usable image from the very start!

OK, the basic Post Processing steps:

  1. Convert your RAW image to Tiff.
  2. Open in Elements
  3. Crop
  4. Run NIK Software’s Define 2.0 noise reduction filter.
  5. Run NIK Software’s Viveza 2.0 and apply STRUCTURE only.
  6. Open the Channel Mixer, changing red and blue
  7. Run the Hue/Saturation adjustment and adjust DOWN the saturation HUE on the Cyan channel.
  8. Run NIK Software’s Viveza 2.0 and make your color, saturation, structure & contrast adjustments across the entire image.
  9. Flatten the Layers
  10. Save in your output library with a meaningful name!

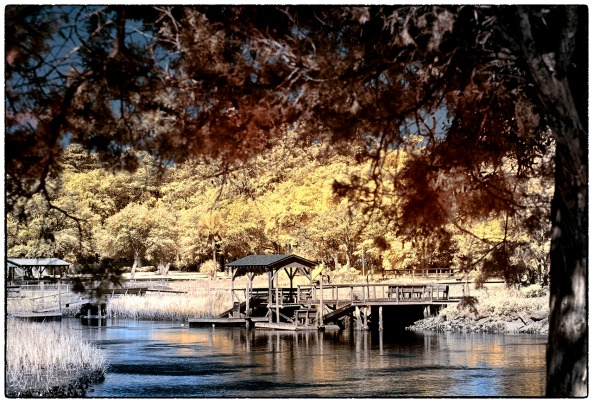
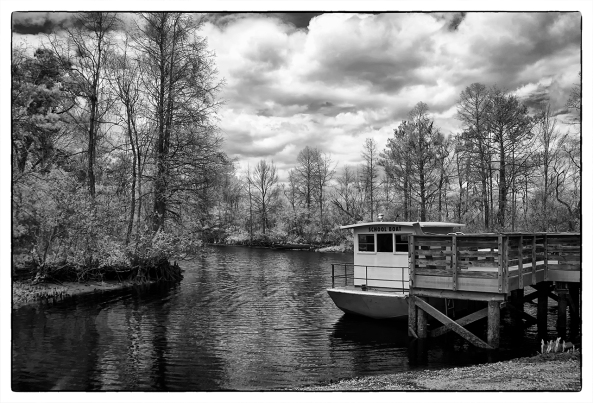
Here is the converted RAW test image that I used for this test.

Processed RAW Ima

_____________________________

Opened in Photoshop Elements Ver 9

Elements 9 With Open RAW Image

Notice the placement of the Elements + tools just to the right at the top of the image! At this point you would crop your image to your own specifications.

_____________________________

NIK Define 2.0 Plugin Window

NIK Define 2.0 Noise Reduction Plugin Window

Most of the time when using Define 2.0 you will find that the automatic selection of noise areas and profile adjustments work great. You only have to press the OK button on the bottom to process the image.

_____________________________

NIK Viveza 2.0 Structure ONLY

NIK Viveza 2.0 Plugin Window

Here we are running the Viveza plugin on our image and applying STRUCTURE only!  We do this by not creating a control point and just running up the structure control.  The reason for this is to define the contrast edges before we do the channel swap.

_____________________________

Running The Red & Blue Channel Swap

Elements + Channel Mixer RED Channel

Select the RED channel and move the red slider down to 0, the blue channel up to 100% and the Green channel up to give the tree leaves a pink/red color.

Elements Plus Channel Mixer, Blue Channel

Next we change the the channel to the blue and run the red slider up to 100% and the blue down to 0.  Do not worry that the overall image is really super saturated, we will fix that later.  Now, you should have yellow/red trees and a blue sky.  Naturally finished and treated wood can take on a greenish cast as well.

_____________________________

Hue & Saturation Adjustments

Adjustment Of Hue & Saturation

Here we will select the CYAN, RED,  YELLOW & BLUE color channels and adjust the Saturation Levels and Hue levels to create an overall image that is within the color range that we like.  You can also select the MASTER channel and lower the overall saturation if it is just too punchy!  I do this specifically to get the shade and contrasts of the blue skies correct.

_____________________________

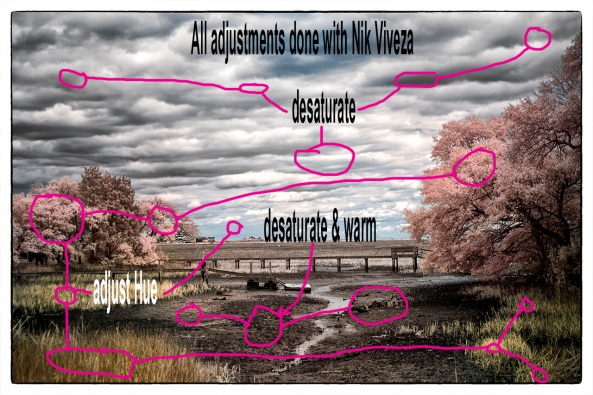
NIK Viveza 2.0 Overall Image Adjustments

NIK Viveza 2.0 Master Adjustments

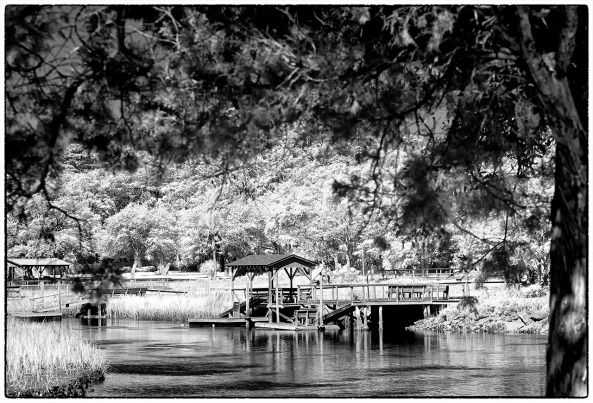
OK, here is where the real work is done. Look closely at this image. Notice the little circles all over the image?  Well, these are adjustment points that I have selected all over the image and individually adjusted for saturation, contrast, structure and hue.  Some of the areas like the wooden dock and buildings I simply ran the saturation all the way down to give me monochrome while adding contrast and structure.  Other areas I added reds and structure as well.  This is where you really create your Faux Color image!  It is all very easy to do but I warn you, keep a box of tissues close at hand because this process involving the NIK filters and adjustment points will get you so excited that you will mess yourself!  They really have to be seen to be believed.

That is all there is to the entire process.  All in all the entire editing process took about 3 entire minuites!  Very fast and very easy.

Please let me know what you think and again a BIG thank you to Martin Young for his input about Elements Plus!